How to Use Slide Mode
Slide Mode allows scripts to advance in fixed sections (“slides”) instead of continuous scrolling. This is useful for artists who prefer static lyric blocks or for external video displays.
Before You Start
(Very Important)
Slide Mode and layer linking require the latest version of HiWire.
If you open a Slide Mode file in an older version of the software:
- Layer linking can be lost
- Slide mapping work may not be preserved
Before building or mapping slides, make sure you are running the newest version.
Turn On Automatic Backups
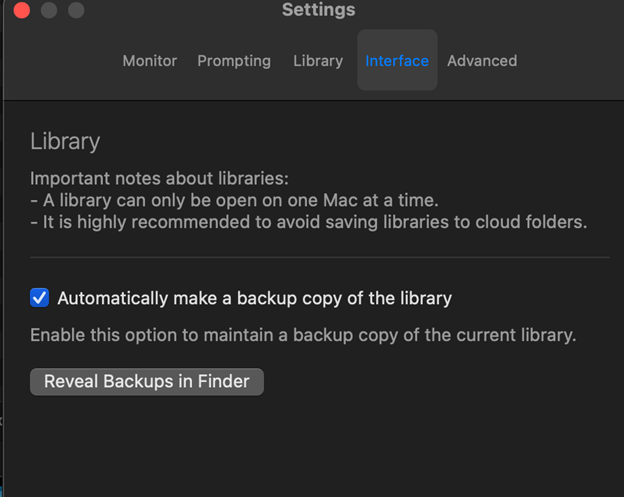
To protect your work:
- Go to HiWIrePrompter → Settings → Interface
- Click “Automatically make a backup of the library”
Step 1: Enable Slide Mode
Slide Mode allows scripts to advance in fixed sections (“slides”) instead of continuous scrolling. This is useful for artists who prefer static lyric blocks or for external video displays.
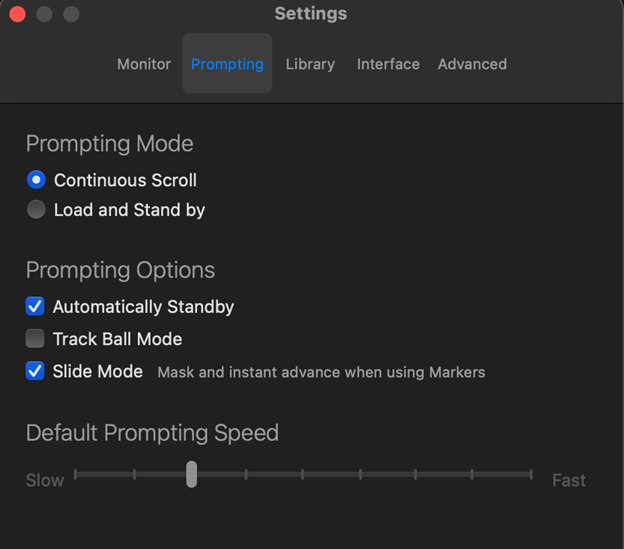
- Open the layer that you want to be in Slide Mode
- Open Settings
- Navigate to Prompting
- Enable Slide Mode
Removing Focus Arrow for Slide Mode
After mapping:
- Resize font to fit the correct number of lines on the slide
- Drag the text to the center of the view to ensure that all lyrics will fit onto the slides
- Update Settings:
- Under “Monitor” turn the Focus Arrow OFF
- Select Large Left Margin
Multi-Computer Configuration Options
HiWire supports:
- Manual Scrolling → Sync Scrolling
- Manual Scrolling → Slide Mode
- Slide Mode → Slide Mode
For SMPTE workflows, each computer should maintain its own feed to avoid signal degradation.
Step 2: Prepare Your Script

- While in the Edit Panel
- Decide how many lines you would like to display on each slide
- Insert one blank line between slides
- Each section between blanks will become one slide
- Add markers for where each new slide should begin. Each marker defines a new slide.
- Add a Marker after the last line if you would like to display a blank screen.
- Drag the focus arrow to adjust the vertical position of the text in Slide Mode. The goal is to center the entire section on the screen so it appears balanced and clearly visible for the artist. Since the arrow was hidden in Step 1, click and drag in the left margin area where the arrow normally appears in the main script view to reposition the text.
How to Add a Marker (2 Methods)
A) In the Edit Panel clock on the number corresponding to the line in which you want to place a Marker.
OR
B) Click on the line where you want the slide to begin
Click the icon next to “Next Marker”
This creates a new slide break
Step 3: Mapping Main vs Layer 2
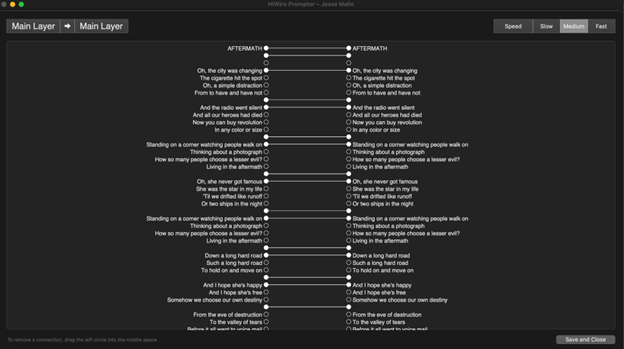
If running Slide Mode on a secondary computer:
- Use the arrow beside the layer to open the linking panel
- Drag the bubble from a section on the Main Layer to the corresponding section on the other layers
- Repeat for each slide section
Note: If both computers are scrolling, mapping is not required.
If one computer is in Slide Mode and the other is scrolling, mapping is required.Important: When Both Layers Use Slide Mode
If both the main layer and the second layer (second computer) are running in Slide Mode:
👉 Markers must be added on the main layer.
The main layer controls slide progression. The second layer follows based on how it is linked.
If markers are not added to the main layer, slides will not align correctly.
Creating Blank Slides on the Second Layer
If you want the second computer to show a blank slide while the main layer displays lyrics:
- In the linking panel, match the main layer text
- Link it to a blank bubble on the second layer
This ensures:
- Main layer shows lyrics
- Second layer shows nothing
Instrumental / Solo Sections
For guitar solos, instrumental breaks, or empty moments:
👉 Add a marker to a blank line on the main layer.
This ensures:
- Both the main and second layers show nothing
- Slides remain properly aligned
- The system does not “hang” on the previous text